
by Brett Wilson
European mounts are a simple and easy process, just takes a little effort and time. So if your a DIY kinda person, keep reading below on 3 simple steps to your very on how to on creating a great looking European mount.
Tools needed:
- Fish hook plyers
- Large pot to boil skull (I bought mine at Walmart as I didn’t have one)
- Air Hose with sports pump needle or small head
- Plastic Wrap
- Baking Soda
- Electrical Tape
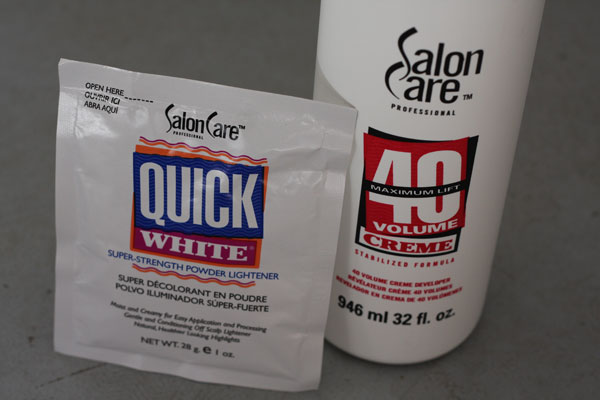
- Salon Care Quick White (1 oz package is sufficient)
- Salon Care 40 proof Peroxide (32 fl. oz bottle)
- Small brush
- Paint tin/pan
- Small ceramic heater (unless you live in 120 degree desert heat). 🙂
- Access to hose, preferably hot (cold will work)
Total Cost: $50-60 dollars depending on what you do or don’t have already around your house.
There are three basic steps in the process of producing a european mount:
1. Cleaning
2. Degreasing
3. Bleaching
1. Cleaning:
Cape out the head of your big game animal, remove all hair and hide from the skull and around the base of the antlers. Then remove the eyes from sockets, tongue, vertebrae, lower jaw, and all the meat you can. The brain will also need to be removed (brain is were most of your grease will come from); a coat hanger wire or stick will help.
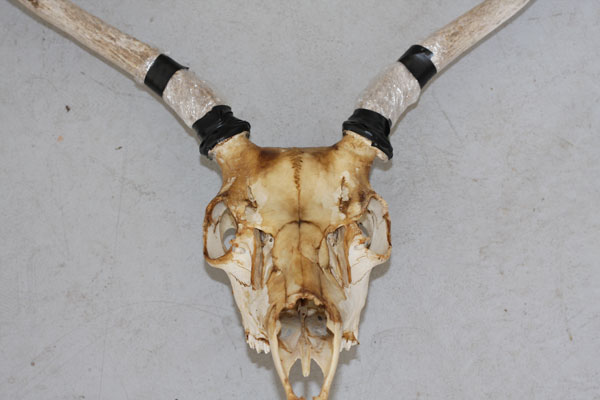
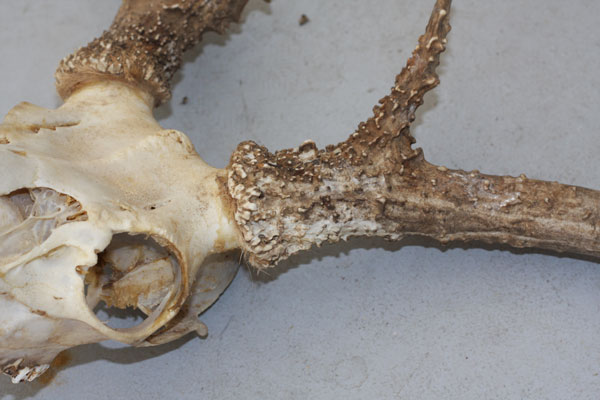
I also like to wrap the base of my antlers in plastic wrap and some good ole electricians tape wile my skull degreases. Just to make sure that it won’t eat at the bone and turn in white during the process. You can see from the pictures below where this actually did happen on the bigger set of horns, some simple touch up paint here will fix that without any problem. But wrap them first, and this step won’t be necessary.
2. Degreasing
This step removes the oils which naturally occur in bones. If a skull is not degreased, it will eventually turn yellow. We are now going to simmer the skull in hot water for a few hours (not boil). You’ll likely want to change the water a few times, although it’s not completely necessary. I used 1 box of Baking Soda in a pot of water and simmered for a couple of hours total. You’ll want to initially simmer for at least an hour or so, then remove the skull and clean off any excess/loose meat and skin etc. Then place skull back in pot for another 30-60 minutes to finish simmering.
Once finished remove skull and place it in a tub or bin or hot soapy water (soap helps to get the remaining grease and oily junk from the skull entirely). Scrub with a brush and or use a pressure washer if you have one to clean out all the holes/cracks/crevices/nasal passages etc. You can also use an air hose to aid in this process if you have one also. It’s really critical here to make sure you get out all the grease, and an air hose with a needle nosed tip will be a lifesaver if possible. If all the grease is not removed or ‘simmered’ out then you will still get some yellowing to your skull. So be picky here, it’ll save you some headache in the end to make sure every pocket is blasted really good.
You’ll want to make sure you pop out the ear canals also, I didn’t take a picture of me doing so but they should be relatively easy to locate and pop out with a simple awl type tool.
3. Bleaching
Heat your skull up in front of a gas or ceramic heater for about 20 minutes to make sure it’s dry. We are almost ready for the heating process, but first we must mix our bleaching agents to turn the skull a nice white color (not nasty yellow). The trick to the bleaching is HEAT, some people think the sun is the magic ticket, not the case here it’s the HEAT that will make the chemicals do there work. Clearly if it’s a cooking hot outside with lots of sun, then that will aid the process and/or be very similar to heat but remember it’s not the sun but HEAT that works the magic and turns the skull white.
Now back to the bleaching agents, you want to get some quick white (whitener) and mix it with a bottle of 40 percent peroxide. These can be purchased from your local beauty supply store. Just tell them what your after and they’ll likely know exactly what you need (my store did). I used about 1/2 of the bottle of peroxide (much stronger than the stuff you have laying around your house) and the entire package of quick white for 2 skulls and that was about the perfect amount. The peroxide will bleach or turn your skull white and the quick white is a bleaching agent that helps the process or turn in ‘whiter’.
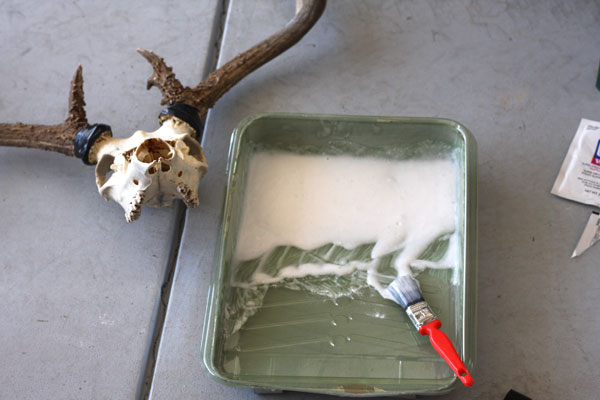
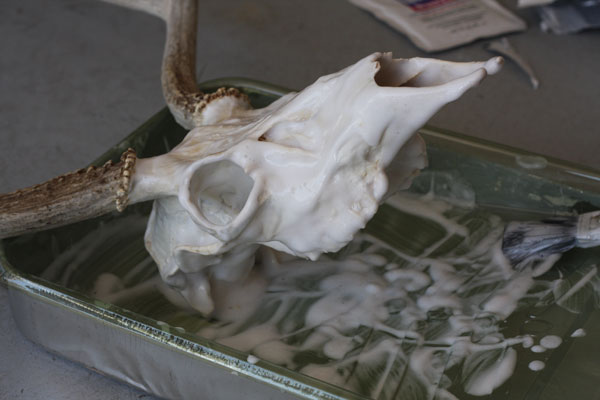
Mix your goo, to were it looks like a Milkshake consistency, and your ready to apply. Use a simple foam or bristle brush and apply the goo nice and thick and EVERYWHERE. Make sure you get it inside and outside thoroughly.
I would now wrap the skull in cellophane (plastic wrap) to keep it from drying out to quickly and not activating agents. Make sure you have enough layers as to not tear a hole or allow the agents to leak out. Dry for about 60 minutes or so, rotating every 10 minutes or so. I actually did mine longer, just to make sure it was really good and white.
Take your skull out of the plastic wrap and spray off clean with preferably hot water, cold will work also. Your skulls should now look perfecto, and you are FINISHED. If they have a slight yellowish tint to them, DO NOT panic. Let them completely air dry for a couple of days and they should look great. If not you may need to re-do the bleaching process one more time. I was satisfied with mine after the first attempt and did not need a second coating.
Final Thoughts
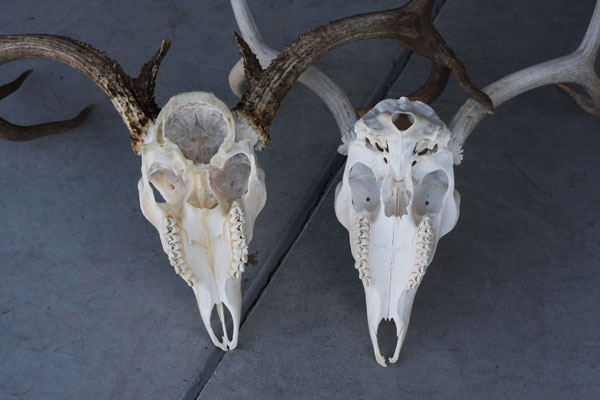
- You’ll notice on the pics below that one of my skulls has a yellowish tint to it, this is the skull that was just removed from the heat and plastic wrap, again do not panic. After a couple of days of air drying, it now looks exactly like the white skull on the (right hand side.)
- I scraped and brush my deers teeth in between simmering also, with heavy duty plastic or light wire brush to aid in removing the brown decay.
- I do not recommend (although it works) using Bleach on your skull as it can break down the bone.
- DO NOT simmer your skulls inside your house, your family will not be impressed and you’ll pay for it. Trust me I made this mistake once and it will not happen again.
- You can use a Borax type degreaser (or even Liquid Dawn)to aide in the process of breaking down the oils while simmering (not necessary though).
- If part of your nose falls off or breaks off during the entire process again don’t panic (part of mine actually did) and I simple super glued it back together and it’s just like new. A zip tie or rubber bands will help hold it in place while it dries.
- Some people like to ‘seal’ the skull with a Krylon clear sealer after they are finished, I did not do this to mine however.
- I’ve also heard of some guys sealing the skull with half water mixture and 1/2 while Elmer’s glue. I have not tried this, so cannot vouch as to whether it’s a good idea in the long run?
- If teeth fall out during the process, simple glue them back in place (mine did not), but I did have some chip and break apart a little bit.
- That’s about it, I’m sure I may have missed something is this write up. So if you have questions, comments, or complaints please post your thoughts below.


Thank you for all the info and so many areas of interest to explore and learn from.
I’ve boiling and scraped I still can’t get everything out of the brain cavity, I live in Arizona so I hung it out in the sun for about a week and hosed most of everything out, should I boil one more time before bleaching ? I’ve heard you can stuff Borax soap in the skull ?
I’ve never used the borax, but have heard it works. So you might try that, yea getting out all the grease is the hardest part and critical. A high pressured sprayer is best with a small needle nose type tip.
I don’t really think you’ll need another boil (depended on how long and good the first boil was), I only boiled mine one time. I’d go ahead and bleach it and see how it turns out.
Best of luck.
Worked great on the 6 pt I shot last week, but after i bleached it, it was left with dark grey/black spots on the back of the skull. Any clue why.? And i tried this on a skull.I’ve had hanging up in the barn for a few years. It took a few bleaching processes but worked great.
Carley,
Never had any black/gray spots before? Sorry not sure how to help, maybe a pocket of grease or something underneath bone?
It was worth a question… But great instructions, very easy to follow and the results are amazing.
Thanks for the information. I have been doing my Western Washington Black tails for quite a few years using bleach and a bucket. While they look alright, I figured it was time to do my latest buck right. I actually put mine in the oven on 170 for an hour. It came out great. Thanks again.
Chris
can I use super glue on the skull?
Yes Super Glue will work!
AM TRYING TO SKULL MOUNT A RAM SHEEP HEAD THE HORNS WILL BE DIFFERENT TO DO. HEARD THEY HAVE TO BE SOAKED FOR A PERIOD OF TIME THEN REMOVED TO BOIL SKULL. DO YOU KNOW ABOUT THIS PROCESS? IF SO CAN YOU GIVE ME A STEP BY STEP DIECTION OR INFO ON WHERE I MIGHT FIND THE CORRECT PROCESS.
Bobby,
Never tried this, but this might help/work for you.
http://www.rmi-online.com/articles/preparing_sheep_horns.html
First time doing this worth a shot. Very help I think got a lot of info out of it. Will let you know how it turns out on Monday.
Just to let the writer know and everyone else. Instructions and process may not be the quickest But the old saying “slow is smooth and smooth is fast” applies here. Be picky and precise and it will come out awesome. Thank you for the tips and help. One thing I did that was a little easier then caping the head out before was to put the whole head with skin and all in the pot and simmer over night and it all falls off or scraps off with the back of the knife. Other then that followed step by step and couldn’t be happier. Thanks so much.
I boiled my cow skull, but I didn’t use the baking soda. I was told about this website after I boiled it. The inside of the horns still have some greasy fat around it, the whole skulls smells like over cooked roast beef and there are tons of little giblets of meat in the cracks and such. Any help here on what to do? I just can not get it clean for the life of me, broke a few knives just trying!
Ashley,
Never done a cow, maybe it’s harder? Did you try some Borax (degreaser) or Liquid Dawn might help degrease things? I’m not sure on the ‘inside’ of the horns with greasy fat. That’s not an issue on Mule Deer Skulls. Try the Air Hose to help blast out little crooks, crevices, etc. You’ll need a pump needle head if you have one. Best of luck!
Bought a buck boiler last year. Have done 3 so far,one I had,had in my freezer for 2 years. Put it in there everything came out easy all sinus cavities stayed in place. Next one was fresh out of freezer from last season.Decided to leave hair on it, came out great like other one but had to do a lot of picking. Other one ws a buck that had been shot and not found. It was in deteriating condition and some hair.It came out great but some yellowing. It still smelled so I put it in a tub with dish soap and let it soak. Now it smells like soap. I have used the 40% peroxide and the white powders bought at salon supply everything has came out great. Read where you can put non glare matte finish preservative on them. Going to try one.Thanks for all your information am going to buy pot from walmart and try that way see if it will be faster. Thanks so much JIM
For the cow horns, what you have is a shell (the horn) on a smallish bone, and some not quite horn or bone jazz joining the two. II haven’t done a cow, but antelope have the same thing going on, it’s like hair on its way to growing int more horn. You’ll want to pull the horn entirely off and scrape that junk away, and then replace the horn using bond to make up for the missing material. Good luck.